Printable Note Cards For the “Everyday”

Printable Everyday Cards

In my daily life, I come into contact with people (as most do..), friends, family, neighbors, coworkers, and more. I have some pretty awesome ones in my life.

I have always been a “note leaver,” Jotting a quick thank you and leaving it on the desk of a coworker, or writing a little love note to leave for the “sheriff” before he heads off to work.

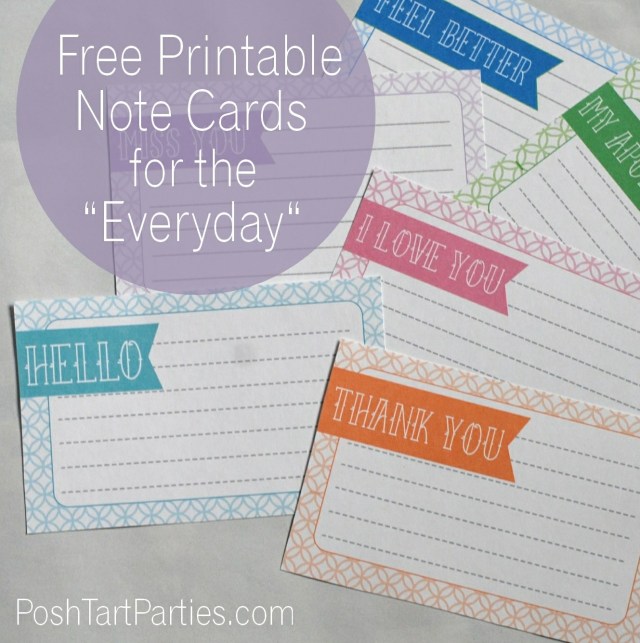
The problem for me, tearing a corner off of a sheet of paper although practical isn’t anything more than that. BUT dainty, printable little note cards, that can be tucked away in your purse or glove box, ready at a moments notice, for any occasion, is pretty and practical. Whether it’s a last minute birthday hello, or get well soon, who wouldn’t enjoy reading your lovely words on an equally lovely little card?

Free Printable Note Cards for the "EveryDay"

Here is the Free Printable File for all six cards!

1.) Free Printable Notes for Everyday Occasions

As always please make sure to credit Posh Tart if you link them somewhere else.

I would love to hear from you, Comments are so lovely to read!

jessicasig

Simple & Practical Gifts that New Moms ACTUALLY need.

Gifts New Moms Really Need
I recently had a good friend bring her own little bundle of joy earth side, which got me thinking about some practical and affordable gifts I could get for her (and family). After doing the birth thang twice now, I have my own opinions on what a new mom REALLY needs post birth.

It wasn’t until after I had my two little nuggets that I realized I had done my friends a huge disservice after they had their kids. Instead of toting a blush pink velvet dress and adorable hair accessories that I physically couldn’t stop myself from purchasing, I should’ve had a basket full of necessities, an easy meal, or something that was actually USEFUL for mom. Here’s a few easy ideas.

1) Create a “gift basket” and include practical items:

– Nursing pads and some high quality feminine pads with wings are a MUST. Hospital provided pads, in my experience, are horrible! You might as well put a gym sock down there, it’d be equally absorbent and comfortable.

Other good items to include, Witch Hazel, Lansinoh Cream, yummy lotion and dry shampoo (A new mom’s best friend!).

giftpost - Copy

-I also like to add something that mom has always enjoyed (pre baby). Her favorite candy, coffee, or magazine. Is she a music junkie? throw in an iTunes gift card. You get the idea. Something that is “her,” the old her, not just the new mom version of her.

giftpost - Copy (2)

– You can never go wrong with necessitites, Diapers, toilet paper, that expensive baby laundry detergent, cleaning supplies, etc. There are days where pulling yourself together to run to the store for toilet paper or dish soap seems like a daunting and impossible task. And they will run out eventually, not to mention all of these PRACTICAL items cost money, so help those new parents save a little and beat em’ to the punch.

giftpost - Copy (3)

2.) Another gift is food. Simple, wonderful, easy to prep food.

A prepackaged and ready to eat meal, like fajitas, lasagna, chicken and rice etc, are such a comfort for new families. No running to the store, prepping and cooking. Just heat and eat. No muss, no fuss.

how to gift for new mom

Package your meal in aluminum pans and other disposables, so they don’t have to worry about dishes or returning your pan. I usually prep twice as much dinner for my family, package up half of it for the new family. I will make some French toast or other easy breakfast dish to include with the dinner. Two easy meals for them, no real extra work for me. I wish I had more meals provided to me by friends post baby, especially for #2. I would’ve taken a meal over another kitschy baby item any day. Just keep in mind the family’s tastes and lifestyle.

3.) Give them time and help them out.

When you arrive to snuggle the new baby, encourage the mom to take a nice long shower, paint her nails, eat sans baby, or any other task she may want or need to get done. Seriously though, try to convince her to shower. It is a true luxury in those early days.

Also, Don’t ask if there is something to do around the house, JUST DO IT! Seriously, most people will not tell you “yes definitely, I would love you to do my dirty dishes.” because us mama bears have a lot of pride. But we don’t have the energy to physically stop you from doing them 😉 Same goes for the laundry, sweeping, vacuuming, and entertaining a toddler-sibling. FYI.

How to help new mom

I am not against frilly and adorable tiny human clothes and knick knacks, just make sure you combine your adorable gift with one that gives the new mom her own separate advantages. Be useful, show love, and snuggle up on that little baby like crazy. Before you know it, that itty bitty baby will be celebrating their first birthday, and instead of packaging up meals, you may be helping create lots of DIY party decorations. Make sure you stop back here when you do 😉 Much Love.
jessicasig

Motherhood is hard – Here’s a pretty printable to save your sanity.

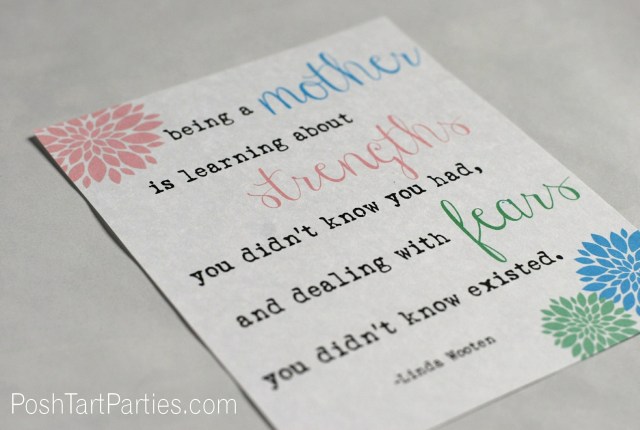
Free Printable motherhood quote

As anyone with kids knows, motherhood is a constant ride of the highest of highs and lowest of lows. (Usually within moments of each other.) One second, you’re patting yourself on the back for something feeling like super mom, and then plagued with guilt (over anything and everything) minutes later.  You can be filled with complete rage and frustration, only to be belly busting laughing and literally melting with happiness the next.

Today, for me, definitely encompassed this intoxicating and exhausting rollercoaster we call motherhood.  I had to purge my system and focus my “mom” energy on something, therapy so to speak. I love this quote and am such a visual person, that having a little inspiration to gaze upon while working at my desk was just the pick me up I needed. So I created a little something to frame. What led me to the brink of mom-sanity? one tough day, seven dead fish, poop-tastrophes and lots of band aids.

I woke up with my three and one year old, to find all five of our seven fish lifeless on the bottom of the tank. This led to an hour and a half of impromptu fish tank cleaning, rescuing and undertaking all before breakfast. The two fish that survived our sudden underwater apocolypse were not boding well, but we did manage to get them into a big bowl of water where the “sheriff” aka daddy,  did everything but give those damn fish CPR, trying to “revive” them back to health.  Ultimately, one fish jumped out of the bowl and met his sad end our carpeted floor, and the other didn’t live more than a few hours more.

I should’ve known in that moment, I needed to gravel with my kids and convince them we all needed to crawl back under the covers and sleep the day away. Because when the start of the day involves seven dead fish, 2 hours of tedious and mind-numbing tank cleaning with two curious little ones under foot, and a whole list to To-Do’s, you just know, dissapointment awaits.

After the fish incident, we had a few clumsy kid injuries, dog vomit, and what we have now dubbed poop-gate of 2014. Details not necessary.

The only silver lining, I got BOTH kids to nap, at the same time even, it doesn’t happen often anymore, so I appreciate the quiet time like no other. Feeling out of sorts, cranky, (feeling guilty for being cranky), and still suffering from a 4 year run of massive sleep deprivation, I needed a little pick me up. I had no chocolate, or wine for that matter. So what better than to work on something to lift my spirits, keep my mom-sanity in check, and remind me that I’m not alone in this crazy mess called motherhood.

Maybe you could give one to a “mommy” you know who would really benefit from knowing that they are being thought of.  We all know how isolating it can be sometimes.

Free Printable Mother Quote 8x10

You can Download Being A Mother Printable Quote , it is in two sizes, the largest being 8×10 incase you have a lovely frame you’d like to use.

Happy mothering y’all. Stay sane, stay strong, stay sanitized (it is flu season!) 😉

jessicasig

DIY Printable – Mini {Thank-You} Gift Bag

DIY Printable Box
I am usually an unorganized hot mess, so when somebody I know, a friend, coworker, neighbor, or so on, does something nice for me, I like to be able to show my gratitude in some small way. I usually don’t have much on hand, And I’ve found through experience, that any gesture motivated by gratitude is appreciated, not so much what the “gift” is.

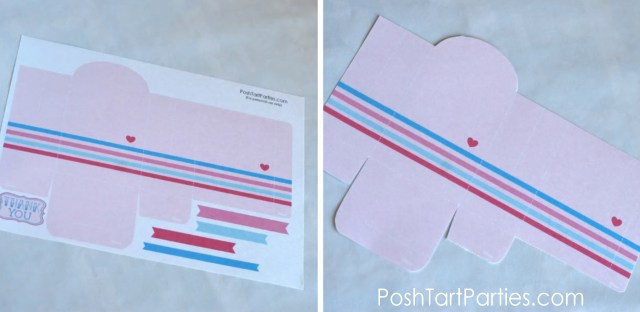
I had a lovely friend, who did something special for me out of the blue. She found this cute little box on her desk the next day filled with yummy chocolates to show my appreciation. (I’m still undecided, if it’s a bag or box. it could easily be a legitimate bag by punching two holes in the top and stringing through ribbon. It’s constructed like a “bag” but I secured mine shut like a box) I have made the printable bag and cute accessories available to download, for anyone finding themselves in need of small thank you gesture. Just follow the simple DIY, place something lovely or delicious inside and give it to someone special.

What you Need:
– White Cardstock
– Glue/scissors

First, Print off the box template and cut out.
Thank You Favor Box

Next, Fold your box, along the dotted lines, and glue flaps, securing your paper into an actual “bag/box” shape.
7

Cut and fold your little flag pieces and thank you tag. Place your goodies inside your bag, fold the front flap over and secure. Then arrange and glue your flag pieces over the top of your bag.
To attach the thank you tag, I cut a small square of cardboard, glued the cardboard to the back of the tag and then onto the box. This makes it a little 3-dimensional and totally cute.
9
8

DIY Printable Gift Box

Now, your box should be complete! and Adorable! I love having an easy go-to gift box when a best friend does something rad, or a neighbor saves me from a dinner crisis. If there are any issues downloading the box, or following the directions, please let me know! Thanks for Stopping By!

Free Printable Gift Box
jessicasig

DIY Crayon Tutorial + free valentine printable

Free Valentine and DIY crayon

I really hate throwing certain things away, simply because I hate spending money on something I had, only because I couldn’t tolerate hanging on to it. I don’t mean stashes of expired yogurt, or thousands of old newspapers, I’m talking bits and pieces of craft supplies mostly.  I had a big ol’ bag of  worn down crayons, they were definitely on their last leg.  Here’s a great way to breathe new life into those sad wax nubs.

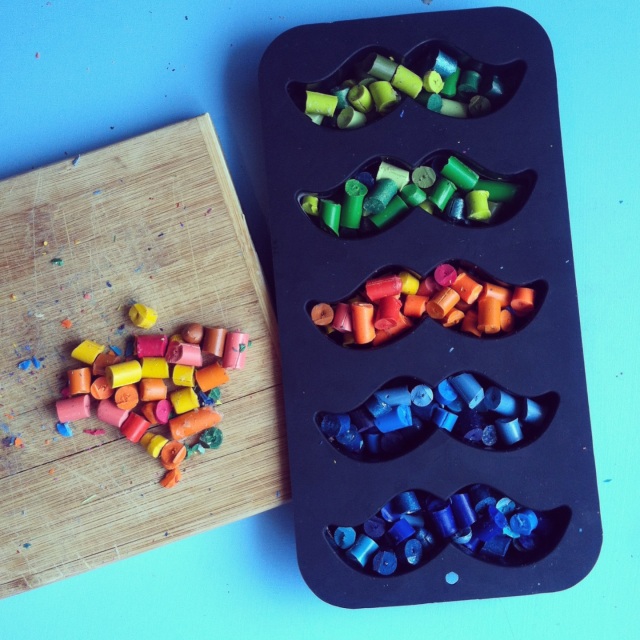
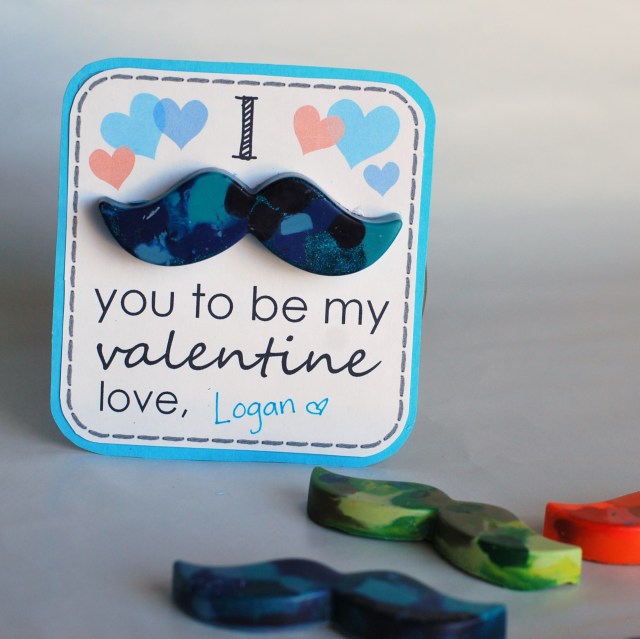
I’m going to show you how easy it is to turn those old crayons into a new awesome crayon that any kid would be happy to color with.  I have a mustache mold that I specifically bought to make these crayons as favors for a “Little Man, Mustache Bash”.  This time, I created a valentine for my son to give to his cousins with the crayons. After the tutorial, I will include a free printable version of the valentines at the end of the post, just in case you find yourself with a mustache mold also.

What You Need:

Crayons (Stripped of paper)

A silicone tray (I got mine in the party aisle of Hobby Lobby. But have seen them at a few different craft/party stores. Any Shape will do.)

Knife & Oven (I promise, I didn’t let those adorable little fingers near that dangerous knife! :))

iphone 057

First things first, you have to peel your crayons. This can be quite tedious. I used a serrated steak knife to slice the paper and peel off, it made the job way easier. Just don’t cut any fingers off. Please and Thank You.

Once peeled, either cut or break into small pieces. (I recommend chopping) I also recommend sorting your crayons by color, if you mix them all, and don’t pull them out of the oven at exactly the right time, you will have an ugly shade of  brown.)

mustachecrayon1

Once done with your prep work, fill your tray. If you fill the tray full, your finished crayon will be about half of the height once melted.
iphone 061

iphone 062


Pop them in the oven on a low temp, I did mine at 175 degrees (in my toaster/convection oven, for about 20 minutes. Once you see the crayons are completely melted, pull them out and let them start to cool. I end up putting mine in the freezer, because I’m way to impatient. If you leave them in “too long,” now worries, they will still be awesome, but it will be more of one solid color, than little chunks of color throughout.

Wait until they are completely cool before popping them out of your tray. Voila’ You’re done!

DIY crayons

I attached these ones to the valentines I made for my little man. But I have also used them as party favors and prizes multiple times. They are so simple, and usually a HIT with the kids. Plus, they cost me nothing. I used leftover crayons that I would’ve tossed otherwise & just about an hour of my time, while the kids were awake (which is really saying something!)

DIY valentine


I {Heart} them a lot.
DIY Crayons


Here is a blue and pink version of the printable valentines for anyone who may just have some mustache molds on hand.

Free Mustache Valentine Printables

Until next time, Much love All!
jessicasig

DIY Cardboard Owl Ornaments

DIY cardboard Owl Ornament
Hello! So back in May of 2012, I planned and styled a “Night Owl” themed Master’s Graduation Party/Open House. The Budget I had was {teensy tiny} and I mean smaller than you’re guessing.. The graduate really wanted to have a nice favor for guests to take home, she found a cute owl ornament made using corrugated cardboard. She found it on pinterest (as most do) but I was unable to find a tutorial. So here is my SUPER SIMPLE version.

What You Need
– Cardboard (I used part of an old box = Free)
– Hot glue/gun
– String/Yarn…thread, shoelace, whatever you have! 😉 (to hang the ornament)
– Paper for the Beak (I used yellow scrap paper)
– Embellishments of some kind for the eyes (I used faux rhinestones from the craftstore, you could use buttons, beads, paper, whatever!)

Ok, First things first. Depending on how many ornaments you’re making, you’ll need to cut your cardboard. If you can cut them into LONG strips, you can save yourself an extra step. You will need two sizes of strips, one for the eyes and one for the body. A guestimate – My eyes are about 1/2 inch and the body is inch-ish. But totally Up to you!
DIY Owl Ornament tutorial

Once cut, apply a little glue to the end of one of your strips, and tightly roll it. I applied a strip of glue down the cardboard to help keep it rolled tightly and secure it as I went.
DIY Owl Ornament 2

As you can see, I didn’t cut my strips long enough to finish the body of the owl in one roll, I had to attach a new piece and keep going. Once you’re at a desired size, complete the same steps for your “eye” strips.
DIY cardboard Owl Ornament tutorial
****Make sure that you are keeping one side of your owl even and flush, (I recommend figuring out which side is cut more straight, and use that as the owl’s front, Keep the edge of your cardboard rolls even and flat.****

Once you have your eyes and body rolled, cut a piece of paper into a small triangular shape and roll into a cone. Glue your eye pieces together, side by side, and then on the underside of your eyes, glue on your beak.
DIY Owl Ornament 4

Take your eyes/beak, apply some glue to the bottom of them and attach to your owl body. Next, cut your wings and attach to the side of your owl. (I would sketch/cut one wing that you like, and use it to trace & cut the remaining. especially if you are making more than one or two ornaments.)
DIY Owl Ornament 5

You’re Almost Finished! I recommend using a pair of scissors, pen, toothpick, to help with this step just because I think my fingerprints are missing due to hot glue gun incidents, and I want to preserve your fingers. Apply a generous amount of glue right behind your “eyes”, take a knotted string/yarn and place the knot in the glue, use your sharp tool, I use scissors and push the knot into the little space between your owl’s eyes, Then apply more glue vertically up the back of the eyes, and press your yarn into it.
DIY Owl Ornament 6

Add your embellishments of choice onto your owl’s eyes, And Voila! you have a Homemade, Recycled, adorable, and practically FREE ornament, favor, or easy small holiday gift.

DIY rolled cardboard owl ornamentsThe quality of this photo is not great, of course my camera flash burnt out that day, in a poorly lit room. C’est La Vie!

Thanks for stopping by! I hope everyone has such a happy holiday season, and please, I’d love to connect with you! so feel free to leave this newbie some feedback, comment, or just to say hello! I’d appreciate it! 🙂

signaturepng

Find Me On: