A Little Man Mustache Bash

A Little Man Mustache Bash

I know the excitement here in my little corner of the internet has been quiet, but trust me, I have been a busy bee. Stretched thin and definitely feeling worn down. But I am super excited for some upcoming changes and other good stuff I have to share. For now, a little walk down memory lane.

My nephew was turning 5, and per usual, I immediately offered to help plan and decorate for his special day. My sister in law decided that a “Little Man/Mustache Bash” was an appropriate theme for her little man.

The Party was held at a local hotel with small “indoor waterpark” that consists of some slides and a kiddie pool. ( The pool had an “upper deck” that was divvied into sections for separate parties, each rented out at a ridiculously high rate. Also, the only food “allowed” was pizza ordered through an affiliate of theirs. (Of course, I managed to talk my way into getting a few things in. I was unaware of all the “rules” and played the pity card. Not to mention it’s 97 degrees and 300% humidity, but I digress.  (Don’t get me wrong, I don’t hate hotel/pool parties, this particular one, is just unbearable for an adult to sit through for more than 20 minutes.. But the kids love it. what’dya do.)

Anywho, back to the shin dig. So As always, the budget was small, and by small I mean tiny. I had a three month old on my hip (moby wrap actually) and a lot to do in the couple weeks I had to prep.  Here’s what I came up with.

I made my own set of Mustache Props and Clip On Bowties (no sew, of course) for the party guests, I will share a DIY for both soon.

Little Man/Mustache Bash

Little Man/Mustache Bash

The mustaches are in a Mason Jar that I lined with cute paper and modge podge. I wrapped the top with some leftover fabric and a bowtie, et voila. It’s adorable! Not to mention the adorable bowtie favor bags for {Distinguished Guests} to take home!

The Snacks we “snuck in” included veggie cups, fruit salad, bottled water, and cupcakes (which were allowed)

Little Man Party FoodThe Backdrop was made from paper bowties and mustaches I traced & cut out by hand, then hot glued string (sewing thread to be exact) onto the back.

There was also a photo booth made from crepe paper that I fringe cut. And the candy wrappers were scrapbook paper that I printed mustaches onto with my home printer and wrapped around little Hershey bars.

Little Man / Mustache Bash DIY

And for the Photo Booth.

Little Man Photobooth

And here’s “The Sheriff”, our own little man, and myself, taking our turn saying “cheeeeese”. (Can you tell we have a thing for temporary tattoos?)

Little Man DIY Photo Booth

And I’m super excited to share that Jillian from Catch My Party, who is a contributor for Spoonful, has featured a photo of this party in her most recent article on Spoonful all about celebrating your “little man”. I’ll get the link posted as soon as I can find it.. I’m a little frazzle dazzled at the moment!

And as always, I so appreciate you taking the time to look around I hope you have found something that can inspire a creation for your shin-dig! Tootles Party People!

The Big Latch On (2013)

Hey there All! So today I’m sharing another Blast from the Past! But before I do, I want to share a few things. I have shared some personal stuff on the site, but those posts are far and few between. Although I have a lot happening in my life that I’d love to share with you, I know that the main reason people come to the site is for “Party Schtuff.” And this post will contain all that same party-hearty goodness, I promise. But I want to give a little back ground on the event and small disclaimer for any one feeling a tish negative today.

The Big Latch On

First, the event I’m sharing with you today is titled “The Big Latch On.” This was our local event which is part of a larger annual event that happens worldwide, where nursing mothers come together at the same exact time and all feed their babies. The actual “latch” and headcount only take about 60 seconds. The totals are tallied nation/worldwide and end up with record breaking numbers of women coming together, raising awareness, and normalizing the natural act of breastfeeding. You can find out a location near you for 2014, how to register a new location for your area, and learn lots more about this event by visiting the Big Latch On website

Before I continue, I am a mom (obviously), and I know that when discussing anything child related, especially in the regards of feeding, birthing, sleep habits, diapering, circumcising, vaccinating, and so on, can be super touchy, hot button topics. I, as a mother, have always made the decisions that I *thought/think* are best for me and my family, as do all mothers and parents. This DOES NOT mean, that if you or anyone else has made a different decision, I or anyone else is judging you negatively because of it, or at least they shouldn’t, As no one should do to me. (Not that I plan on really discussing anything “breastfeeding” related but the event itself, I feel the need for a semi-disclaimer)

As women, we should empower and praise one another, who else knows how hard it is to be a woman, wife and mother, but us. That being said, I made the decision to nurse my children. My son for just over 2 years, we eventually weaned about 10 weeks before I gave birth to my daughter (yes, I said 10 weeks). Well… she is just nearing 2 years old herself, and that totals almost 4 constant years of nursing. I am proud of it and am happy that I made that decision for my family. And just because I can, here are some gorgeous pictures that I was lucky enough to have Erica McCauley capture of my beautiful baby and I.

Nursing My Sweet

To some, nursing is “icky”, unnecessary, and “rude” to do, especially in public. To which I say, Namaste y’all.  I was bottle fed, and did indeed “turn out just fine.” But I believe that nursing is beautiful, natural, and am so lucky to have had the experience. Not to mention, when a baby needs to eat, it needs to eat, and I would not condemn anyone to the bathroom stall, vehicle, or other inconspicuous corner to eat their meal.

Me and Z
Photo Credits: Erica McCauley Birth Photography

No mean spiritedness will be tolerated. Only love here folks’. Okay. Disclaimer over. Carry on.

The Big Latch On

In 2012 I saw a flier in the “nursing mother’s room” at the state fair that summer. I checked it out online and knew I wanted to take part in it. Sure enough that August, I nervously showed up at the doorstep of a woman I didn’t know, ready to meet some moms, and participate in something that I was really proud to be a part of.  There were about 12 of us that year, many of the women were members of the local breastfeeding group and knew each other that way. The weather was crummy, so we relocated to a nearby home instead of a park, there were lots of snacks, and nice mommies to chat with. It was great. So when 2013 rolled around, attending the event was a no-brainer. When they started looking for sponsors and door prize donations I threw my hat in the ring which led to me taking on more of a role in the setup/aesthetic aspect of the event (Which was very fun)

The amazing Erica McCauley, an amazing woman and birth photographer and her friend Sara (who just happens to be a doula, which is totally rad) were the ones really heading up this whole thing and I was just there to lend assistance when they needed. We brainstormed some ideas and concepts and came up with a few things.

Erica Wanted to do some Mini-Sessions for nursing moms who wanted them done, We also needed something to provide a little shade if were really hot that day.  I ended up putting together a PVC enclosure and using sheer window drapings as walls. It however didn’t get used at the event, simply because we live in North Dakota and mother Nature hates me. The wind made it impossible to safely keep it up and not stress about it.

Planning for Big latch On

I covered water bottles, made lovely banners and buntings for the snack table, for sale items, sign in and more. 

For the large backdrop and signs I used foam board from the craft store, covered it with a craft paper and used basic white acrylic craft paint and letters I cut with my Cricut Mini.

The Big Latch On Minot 2013

Ultimately the turnout was astounding, More than we could ever have imagined. The year before it was literally less than 15 of us, all three of us expected maybe 30ish people this year. Over 100 people showed up (I think :/). Whatever the specific number was, It was awesome (until we ran out of food, but even then, still awesome)!!

The snack table was swarmed and ambushed the second families started arriving, leaving nothing but bare food stands and crumbs in their wake.
BLO Snack Table

There was a great door prize table filled with goodies for all ages.
Door Prizes at BLO
(I donated a homemade wood sign that I was quite pleased with!)
DIY Wooden Sign

There was a table where “boobie hats” knit by local crafters could be purchased.
For Sale Boobie Hats at BLO2013

I also set up a “craft/activity” table for the older kids. As usual, I had no real extra money to put into this little side project, so I cleared out my ribbon and other misc craft stashes and wound up with enough stuff to make puppets, picture frames and magic wands (which were the biggest hit of all) plus whatever random things the kids came up with.  The table ended up being a bigger hit than I expected and I was definitely thanking my lucky stars to have two amazing volunteers there to help out!
Craft Table at BLO event

Here is a shot of the mini photo session set up and our massive turn out during the official “latch” itself.
The BLO

Got Milk The Big Latch On

The Big Latch On - Keep Calm and Latch On

The Big Latch On 2013

Me and Z at BLO

What a fun day! I can’t wait to start working with these amazing ladies on this year’s Big Latch On! A big thank you to Erica McCauley, please find her on facebook or check out her web page, she is truly one of a kind.

Don’t forget to check out the Big Latch On even closest to you if you’d like to participate or visit their website for more information on how to register, donate, and more!

As always thanks for stopping by! I’d love to hear from you, leave me a comment, find me on facebook or pinterest. Just connect with me in some way and let me know what you think of the site thus far. I love feedback!! And don’t forget you can check out how I made the tassel bunting you saw on the snack table here! Toodles party people!

signature

A Purple People Eater (Double) Birthday Bash

Purple People Eater Birthday Party
I’ve been MIA for the last week-ish, with a house crammed with stuff to organize and clean, a computer full of craft files and 2 years worth of work and pictures that decided to completely CRASH, Many tears shed (over the death of that computer), and another birthday of my own came and went without a huge fanfare of celebration (which is just fine!) Plus I did end up with a new computer.

So here I am, with nothing new and exciting to share…having to start from scratch. So something old and exciting it is! Here we go.

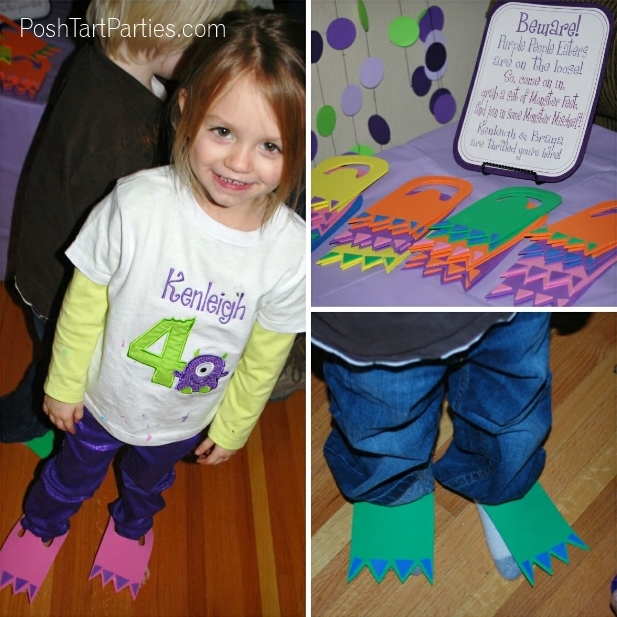
Last October I was lucky enough to celebrate two beautiful little girls’ birthdays with a Purple People Eater Party. It was a one eyed, one horned, flying monster themed DOUBLE party for the sisters.

Looking back, there are so many things that I’ve learned since then, and if I could go back in time and tweak, I totally would. So Keep in mind, this was literally one of the first parties I had ever thrown, I had a 3 month old and 2 year old, who highly impacted the amount of time I had on the “party day” to set up and focus on the event. (Long story, overwhelmed mommy. period.) But that’s not to say the party wasn’t a success, it was! the kids and parents who attended had a marvelous time, filled with activities, fun, and sugar. 🙂

The Party rundown goes something like this!

First, When guests arrived at the party, the were greeted with a *Warning* sign and Monster Feet to wear. (I thought it was a cute substitution for party hats!)

DIY Monster Feet

I made them by creating a “template” on paper (it took a few drafts to find a shape I was happy with), and then using sheets of craft foam, I traced and cut them out.  I cut three triangles for the toes (cutting one in half) and hot glued them on! I made two sizes also, just because friends of both girls (one turning 2 and the other 4) would be there.

They were a huge hit!

DIY Monster Feet Birthday Party

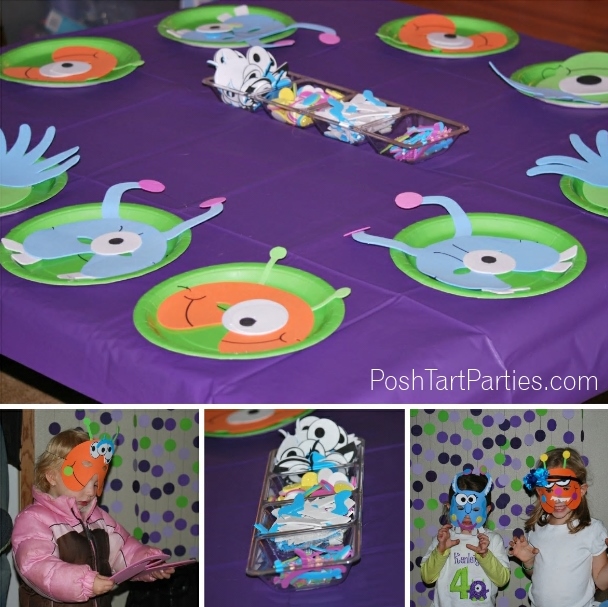
Once the guests were settled into party mode, they all sat down and were able to make fun Monster Masks!

(I bought a mask making kit from Oriental Trading Company, and added fun accessories like eyeballs and other monster “parts” for the kids to use on their masks. (it was nearly Halloween, and I was able to find lots of monster accessories at the local craft store)

Monster Party Activities

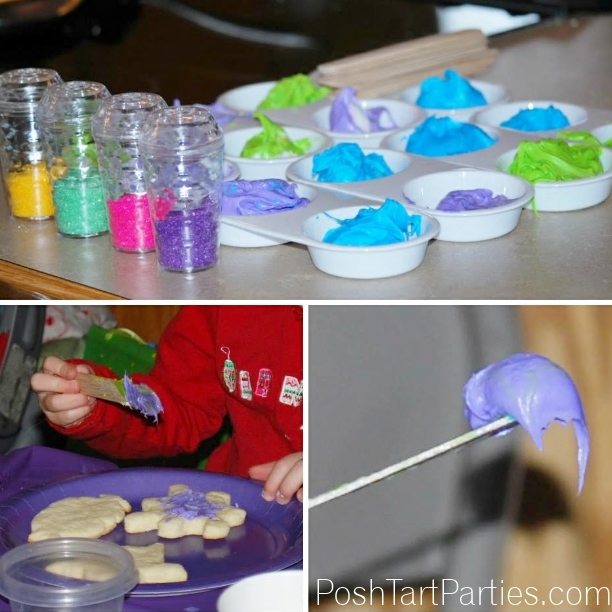
After the Mask Making – I swapped out the setup from masks to delicious monster shaped cookies.

Each kid received three monster shaped sugar cookies (made the that they could decorate to their hearts desire. (When they finished, we assigned the “grandmas” to bag them up in cello with ribbon for guests to take home at the end of the party)

Cookie Decorating Party Activiy

Now, Onto the decorations.

I ended up using my “Mini Monsters” Cartridge and my Cricut Mini to cut out the Monster shape, I had to alter them a bit myself in order to get the single horn on top) I also used my Cricut to cut the letters and pieces for my banner (this was before I realized how easy printables were)

There was also a PhotoBooth, which consisted of lots of circles glued together with a strand of thread sandwiched between them. Did I mention…LOTS of circles. 🙂 It was easy though, I used a 2inch circle punch, hot glue, and black thread.

 I simply taped up the strands of the backdrop to the wall on the day of the party.

PPurple People Eater Monster Party

I also made some simple triangle bunting, again using the circle punch for the polka dots, two layers of purple paper (one color slightly larger than the other), and some cute ribbon glued over the top.

Purple People Eater Monster Party

There were a few “mini party stations” where guests could play with the singing Purple People Eater doll we found at Wal-Mart, leave the girls a birthday message, and of course eat, eat, eat.

Monster Party Sign In

I can’t seem to find all my pictures from this party, BUT, sloppy joes, chips, veggies, and other typical party food was served. I glued leftover googly eyes onto paper party cups because… well, who can resist.

Purple People Eater Party

Onto the Sweets:

The cake was made by a local woman who makes cakes in her spare time and did a totally rad job!! It was so cute, I love the little bite taken out of it. I passed along some pictures of the décor as I was working on the party, that way she could have a jumping off point to create the adorable cake.

Purple People Eater Cake

The rest of the table consisted of:

 Blueberry Cheesecake Fudge (with toppers, of course) purchased from a local candy store. Chocolate covered Oreos, Popcorn (aka Monster Munch) with paper cones, and an assortment of candy dressed up as Monster Parts (like toenails, hair, tails etc). Also some cute Monster cupcakes (I almost forgot about them!)

Purple People Eater Party - Sweets Table

After the party guests were pumped full of monster sized amounts of sugar and party fun, they were given little mini bucket favors, (that I also ordered from Oriental Trading Company for super cheap) and dressed them up by gluing white triangle teeth and googly eyes on them. They were filled with monster tattoos and other misc. little party goods.

The adults that attended the party were walking away with a delicious monster cupcake, which were all boxed up and ready to go for them.

Monster Party Favors

And before all the guests were gone, we rallied them up and snapped some fun photo booth pictures.

DIY PhotoBooth Purple People Eater Party

Well, that about wraps it up. This party was such a blast, and I really did learn so many things while planning and prepping for it. Like, ELEVATION! Your dessert table NEEDS elevation, even if is just a wrapped box for under your cake. Also, it takes a really long time to set up, from packing up the car, hauling it and unloading at the venue, unpacking, set up, pictures, etc. etc. So plan accordingly and stay organized in order to make the day of set up a breeze… well that’s an exaggeration, I’m not sure it’s ever a breeze, but definitely less stressful!!
DIY Monster Party - Purple People Eater

Thank you so much for stopping by!! This little site of mine is still very new and a work in progress! BUT I appreciate all the lovely feedback I’ve gotten so far, It’s the only way I know what’s working and what isn’t! PLEASE take a moment to connect with me. Leave a comment, find me on facebook, check out the party love on pinterest or shoot me an e-mail. I LOVE hearing from you!
signature

A DIY Mickey and Minnie Party Wrap Up

Free Mickey and Minnie Party Printables

Hey there Party People! So it’s been a week FULL of Mickey and Minnie Mouse! I hope I didn’t tire anyone too much of these classic characters! I’m creating a round up of all the downloads available in the last week’s worth of posts for easy downloading and printing. If you missed any of it, definitely check out the individual posts to see any tutorials and get more information on the party goods.

All in all, I’ve shared Lots of cute stuff. Check each post out individually, if you so desire. 🙂 (or you can get all the downloads at the end of the post)
1.) Party Bunting
2.) Birthday Banner
3.) Cupcake Wrappers and Toppers
4.) Beverage Wrappers and Straw Flags
5.) Easy Centerpiece
6.) Party Hats

If you’re confident in your crafting and assembly skills, you can skip right to the downloads below!

Free Mickey and Minnie Party Printables & Easy DIYs

Free Mickey & Minnie Party Printables

1.) Mickey Mouse Party Bunting
2.) Mickey and Minnie Happy Birthday Banner
3.) Mickey and Minnie Cupcake Toppers
4.) Mickey Cupcake Wrapper
5.) Mickey and Minnie Beverage Wrappers
6.) Mickey Mouse Straw Flags
7.) Mickey Mouse Thank You Tags
8.) Mickey and Minnie Bubble Wrappers
9.) Mickey and Minnie Silverware Wrappers
10.)Printable Mickey Mouse Party Hats

Whew! That’s it! (I think I got them all.. If you notice any missing, or not working, please let me know, I’ll get them fixed up in a jiffy!)

If you are able to use any of these printables at your clubhouse soiree, I would LOVE to hear from you! Shoot me an e-mail, find me on facebook, or leave me a comment below! I love hearing that people are getting use out of my party goods, it makes my heart happy.

An Easy and Inexpensive Mickey and Minnie Centerpiece

So this is the last of the Mickey and Minnie party goods and DIYs that I have to share (for now at least!) My next post will round them all up into one easy to access post!

DIY Mickey and Minnie Mouse Party Centerpiece

This Centerpiece literally cost me less than $5 dollars, and that’s pushing it, I’d be willing to bet my grand total is less than $3, but I have an unfair advantage of an entire craft stash of leftover “craft crap” that I’ve been accumulating for the past year.

But here’s the breakdown of what I used.
– A flower pot from the local Dollar Tree (You could use any sort of container. Then use paint, paper or fabric to cover it.)
– A few sheets of colored paper (for medallions and crinkly filler inside the pot, not that you have to make your own!)
Bamboo Skewers (I get mine at the grocery store for .99/per pack of 200. It’s a good deal!)
– Small square of Floral Foam (Find it at the dollar store!! It’s way more expensive at the craft stores)
– I also used a small bit of white cardstock to print on, pipe cleaners, and a small bit of felt for the buttons on the front.

If you want to download the larger version of the Mickey and Minnie Mouse that I used in this centerpiece you can download Large Mickey and Minnie Heads

18

First Step: Make some paper medallions, print off some Mickey/Minnie silhouettes and then glue the backs of them to bamboo skewers.
Second: Place your floral foam in your pot and tap into your inner florist by creating a pretty arrangement that is pleasing to the eye.
Third: Curl your pipe cleaners around a glue stick or pencil and place them into your arrangement by wrapping the end of the pipe cleaner around your skewer. Add a tish of glue to keep them secure.
Fourth: Fan fold some paper in the same manner as your paper medallions and snip it into little crinkle pieces. (You can easily buy “filler” at the craft store, but (for me) didn’t solely warrant a trip out in the bitter cold with the little humans that follow me everywhere.)
Fifth: Dump in your filler and cut some ovals out of felt or paper and attach to the front of your centerpiece using glue.
VOILA! You’re Done!
DSC_0810

I’m sure yours will be equally, if not more adorable! So much frugality and cuteness wrapped into one awesome centerpiece!

If you are planning a Mickey or Minnie themed party, I’d love to hear from you!? What sorts of awesome DIY’s and party projects are you planning for your event? Have you seen the Free Mickey and Minnie printables I’ve already posted? I think they are pretty cute! Leave a comment and share your thoughts! 🙂

And don’t forget you can check out all the Mickey and Minnie Party goods and printables posted this week right here in a round up post!

I would so appreciate it if you stopped by and followed me on facebook or pinterest to keep up to date on all the latest, not to mention, I’m having a secret love affair with pinterest. shhh.

Easy Favor Ideas + Mickey & Minnie Favor Printables

Free Mickey and MinnieFree  Party Favor Printables

No party is complete without party favors for the guests. We are definitely exiting the days of clear cellophane bags filled with expensive party store favors and cheap neon plastic whistles. It’s not so much quantity of crap-o-la that matters. One item, packaged in a cute way, with some ribbon or a cute tag, is just as exciting to the little party guests to receive and a lot less clutter for the parents to take home (and eventually secretly trash) with their kids.

Also, favors, of any nature, can add up in cost rather quickly. I love using simple and affordable items to send with guests. Things that are appealing and can be used by kids of varying ages and as always inexpensive. Here’s a few cheap ideas that I’ve found to be successful plus the Mickey and Minnie printables to go along with them!

(Before I start, I used colored and white cardstock for all my printables and used/recommend a low/mid temp hot glue gun!) Okey dokey! here we go!

First up! The basic Favor Tags. They are 2″ and I used a 2 1/2″ scalloped circle punch for a border. You can hand cut and leave without the border if you don’t have any extra “tools”. Punch a hole in the top and attach to your favors of choice with ribbon! So Simple!
Free DIY printable favor tags
Free Printable Mickey Mouse DIY Favor Tags

Second on the list! Another simple option, print off these Mickey and Minnie labels, they were initially intended to be silverware wrappers, but they make cute packaging for chalk. I found a 12 pack bucket of chalk at the dollar store. (I {Heart} the dollar store)
DIY Mickey Printable Favors

Another guaranteed hit, as any parent knows, is bubbles. Bubbles are amazing, inexpensive, and practical! Who doesn’t love bubbles once in a while! Here are some cute wrappers, they are a general size, and can easily be trimmed down to fit a smaller bottle.
Free Mickey Mouse Pary Printables - Bubble Favors

And my favorite of all! Sometimes you just have to improvise with what you have. I tend to walk the fine line of becoming a hoarder (or so Chad says..) and I just happened to have a full set of empty spice jars sitting in a cabinet. (they originated from one of those countertop spice racks that you can buy prefilled at any walmart/target type store) Anywho! I’ve had them for a while, and I finally found a great way to reuse them.

First, I printed off the favor tags and I also printed off the straw tags that you can find in this post H.E.R.E. Then I cut the straw flags in half and glued them onto the back of the tag. Punch or poke a hole in the top for your string. Thread the string through and wrap around the top of your jar. Simple!

Easy DIY Mickey Favors + Free Printables

DIY mickey favor packaging

How easy and cute are all these guys!
DIY Mickey Party Printables & Easy Favor Ideas

Alright! That’s it! Here are all the Downloadable files, If there are any Issues please let me know!

1) Mickey Mouse Thank You Tags

2) Mickey and Minnie Bubble Wrappers

3) Mickey and Minnie Silverware Wrappers

For the straw flags you need to check out THIS POST.

Oh so much Mouske-cuteness. And don’t forget you can check out all the Mickey and Minnie Party goods and printables posted this week right here in a round up post!

I would so appreciate it if you stopped by and followed me on facebook or pinterest to keep up to date on all the latest celebratory happenings. Not to mention I really {heart} pinterest… I mean Really.

jessicasig

Free Mickey and Minnie Mouse Straw Flags & Beverage Wrappers

Mickey and Minne Free Printable Drink Wrappers and Straw flags
I’m starting to get this Mickey and Minnie party set wrapped up, but before I share the last few posts, I figure I’ll throw in a {mini} post before I get the final few shared.

Dressing up your drinks is such an easy way to jazz up your party decor. Whether you’re using water bottles, juice boxes, or paper cups. A pretty wrapper and cute straw makes any drink more delicious!

What You Need:
– White Cardstock
– Paper Straws
– Glue
– Drinks of your choice! (obviously)
– Downloadable Mickey and Minnie Beverage Wrappers
– Downloadable Mickey Mouse Straw Flags

For the wrappers, Simply print and cut. Then attach them to your bottle. (I use a Low Temp hot Glue gun)
Free Mickey Mouse Bottle Wrappers

Paper straws are not only adorable, but as of recently a party Must-have. You can find them at most any craft store, in a variety of colors and are usually only a few bucks for two dozen. Customize them with a cute flag and bask in the super-mom glory as your party guests ooh and ahh over you rad party skills.

I have found the Easiest way to cut straw flags to ensure that the ends are even when you glue the two sides together is to cut a straight line flush with the pointy edges of your flags, then cut the remaining long sides of your flag. Free Mickey Mouse Straw Flags

Fold over so your flat ends are even, add some glue and secure to your straw. Trim them up AFTER you’ve attached them to ensure that your ends are pristine and clean. 🙂
Paper Straws and Flags Free Mickey Printable

Free Mickey Party Printable - Bottle Wrappers and Straw Flags

And You’re Done! Easy as pie. Don’t forget to check out all the Mickey and Minnie Printables from the past week. They are (in my opinion) Super Cute! If you’re able to incorporate any of these party printables into your shindig I would LOVE to hear from you! E-Mail me, Leave me a comment below, or follow me on Facebook or Pinterest!

Free Printable Mickey & Minnie Mouse Cupcake Wrappers and Toppers

Free Printable Mickey and Minnie Cupcake Toppers

Happy Tuesday Party People! Another day, Another party…printable, that is! *Wah Wah* But seriously, it’s a cute one today! I’ve been up to my {mouse ears} getting all the lovelies prepped for this double Mickey and Minnie Birthday Party. You can check out the printable party hats, Banner, Bunting and more. They all coordinate for a somewhat gender neutral, clubhouse themed party!

Cupcakes are on today’s agenda. Simple toppers and wrappers can dress up any cupcake, from homemade, supermarket, or a local professional bakery, no delicious baked good can refuse an adorable accessory! 🙂

What You Need:
– White Cardstock
– Toothpicks
– Hot Glue/Gun
– Downloadable Mickey and Minnie Cupcake Toppers

And if you want the wrappers also you can download Mickey Cupcake Wrapper
(I have to give a heads up on the wrappers, the scalloping along the top is “too tight” you may have to just free hand the top depending on how much time you want to spend cutting… Sorry, Next time will be better!)

Simply print and cut the toppers and wrappers.

Take your Mickey and/or Minnie head topper and glue a toothpick onto the back. That’s it! Easy Peasy!
Free Mickey and minnie Cupcake Toppers

For the wrappers, I find it easiest to ignore cutting the tedious flap and just glue them ahead of time, rather than assembling day of party, just drop your cupcake right into the top. But that’s just one girl’s method. Whatever works for you!
Free Striped Mickey/Minnie Cupcake Wrappers

Free Mickey and Minnie Printable Cupcake Toppers and Wrappers

My printer was acting a little hinky.. and leaving lots of annoying little lines. it apparently needs a Mouseketool! 😉
Free Mickey and Minnie Cupcake Wrappers and Toppers

Don’t forget to check out the rest of this cute party set, all completely free for anyone to download for personal use. You can spend that saved money on delicious food or other party goods!

As always, a BIG thank you for stopping by! If there are any issues downloading the toppers or wrappers, please let me know and I’ll get the fixed in a jiffy!

Don’t forget to check out all the Mickey and Minnie Printables from the past week. They are (in my opinion) Super Cute!

If you’re able to incorporate any of these party printables into your shindig I would LOVE to hear from you! E-Mail me, Leave me a comment below, or follow me on Facebook or Pinterest!
 

A Mickey and Minnie Mouse Party – Free Printable Happy Birthday Banner

Free Printable Mickey Mouse Birthday Banner

Hey there party people! It’s early, and I’ve been up since the wee hours of the morning, I fell asleep with the kids last night at “bedtime” (As us tired moms sometimes do) And now am feeling WIDE awake and ready to share some awesome Mickey and Minnie Party Printables.
If you missed the first two posts about the Mickey AND Minnie Shin-dig that I’m working on, you should definitely check out the Party Hats and Mickey Mouse Bunting. This party was designed specifically for a local brother and sister having a “hot-diggity dog” Double party.

Today I’m sharing the free printable version of the Happy Birthday Banner that was made to coordinate with the rest of the printable party goods.

What You Need:
– White Cardstock
– Yarn/string
– Glue (I highly recommend hot glue & gun)
– Downloadable Mickey and Minnie Happy Birthday Banner

It is so easy to assemble, simply print out on white cardstock, cut out along the lines, fold over the top and glue to string (you can follow the simple instructions here.
DIY Mickey Birthday Banner

When you are done you have an awesome and custom Happy Birthday Banner!
Free Printable Mickey Mouse Party Birthday Banner

Adorable! and Easy, Right!? I am just loving clubhouse colors. If the download isn’t working, please let me know, so I can use my mouseketools to fix it! I would LOVE to hear from you if you benefit from this free party! Or see your party goods in action!

Oh Toodles. Time to go nurse the princess back to sleep. Stinker.

{Mix & Match} Printable Mickey Mouse Party Bunting

Free printable mickey bunting

It’s going to be a week full of Mickey & Minnie Mouse cuteness. Just a recap, this specific party was designed for a brother & sister celebrating their birthdays with a joint party. So the decorations needed to be appropriate for a boy and girl. I shared some easy Mickey Mouse party hats yesterday, don’t forget to check them out.

Today, I’m sharing some easy to make, printable bunting/banner. I provided each color on a separate page so you can mix and match the colors in a way that coordinates with your party! (colors included: Blue, Green, Red, Yellow & Pink.

What You Need:
The Downloadable PDF Mickey Mouse Party Bunting
White Cardstock
Yarn/String
Glue (I recommend Hot glue)

First, print and cut out the bunting pieces. Fold the tops of the banner pieces over and arrange in an order that makes you happy. Apply Glue to the back of your folded “flap”, place your yarn flush with the folded crease and secure the “flap” down until the glue is cool. Rinse, Lather, Repeat. Just kidding, just repeat! 😉
DIY mickey banner

When you’re done, you have an adorable, handmade (YES, it counts as handmade!) party banner. 🙂

mickey mouse diy bunting

Don’t forget to check out all the Mickey and Minnie Printables from the past week. They are (in my opinion) Super Cute!

If you’re able to incorporate any of these party printables into your party I would LOVE to hear from you! It’s the only way I know if people are using what I’m posting, and I hope you are!

E-Mail me, Leave me a comment below, or follow me on Facebook or Pinterest!

jessicasig